So I know I'm extremely behind in my blogging and actually have a lot to report back on, including my experiment with frying chicken wings and a meatball project collaboration with a few friends (a surprising learning experience!), but I just read an exciting piece of news: McDonald's has yet another Monopoly-esque promotion!
For those of you who know me (and/or have read my previous posts about McDonald's), you know that I am a huge sucker for anything involving "free" game pieces that involve the potential to win money, free food, etc. Imagine my surprise and joy when reading the McDonald's press release introducing their new OLYMPICS game! Like McDonald's, this promotion involves game pieces fixed to the packaging of select McDonald's products; unlike the Monopoly promotion, this one seems to also be promoting McDonald's new "healthy" image. For a limited time, purchase any item off of their "McDonald's Favorites Under 400 Calories" menu to be eligible for a chance to win various prizes, including electronics, money, free food, etc.
...it looks like I will be eating a whole lot of McDonald's until this promotion expires!!!
http://www.usawinsgold.com/#/EnterCode
Tuesday, July 24, 2012
Wednesday, February 22, 2012
The Pizza Project

So in all honesty, I'm not really a huge fan of pizza. I'm not a huge fan of tomato sauce, not that into the idea of eating slabs of dough (I don't really eat bread either), and not in love with cheese either, so there's really not much about pizza to get me excited. But there is an exception (isn't there always?). Certe happens to make a DELICIOUS "farmer's" pizza with shredded potatoes, corn, and cheese and it is P-H-E-N-O-M-E-N-A-L, enough to make me willing to trek up to midtown just for a slice. The problem is, though I may love this pizza, it doesn't really seem worth it to travel all the way to midtown east JUST for a slice of this pizza (clearly I'm not the type of person who treks across the Brooklyn Bridge for a slice of Grimaldi's), so I decided to try and make my own!
The inspiration to make my own pizza actually came from a brunch I hosted this past weekend, a fundraiser for an organization called Bear Givers. One of the dishes I made was a breakfast pizza, topping Whole Foods Organic Pizza Dough with bacon, sausage, hash browns, cheddar cheese, parmesan cheese, and an egg and milk mixture. The pizza was so simple (and thanks to this brunch, I now had a pizza pan and pizza slicer), so I figured, why not make more of my own pizzas? Plus this way, I'd be able to customize the pizzas to my own liking, so thus I began my pizza project!
For my first pizza (well, technically second if you count the breakfast pizza), I chose to do my own personal rendition of the Certe farmer's pizza. But first, I had to make the dough!

Following this pizza crust recipe, I prepared the dough. It was actually much more simple than expected and fairly straightforward - let yeast and brown sugar sit with warm water for 10 minutes, mix in salt and oil, followed by 2.5 cups of flour.

Knead on a floured surface until the dough is "no longer sticky" - I decided I had reached the right point when I no longer felt my finger might get dough stuck on it, but I wouldn't necessarily call that point "not sticky." Then let it sit for an hour until it doubles...

...and voila - like magic!
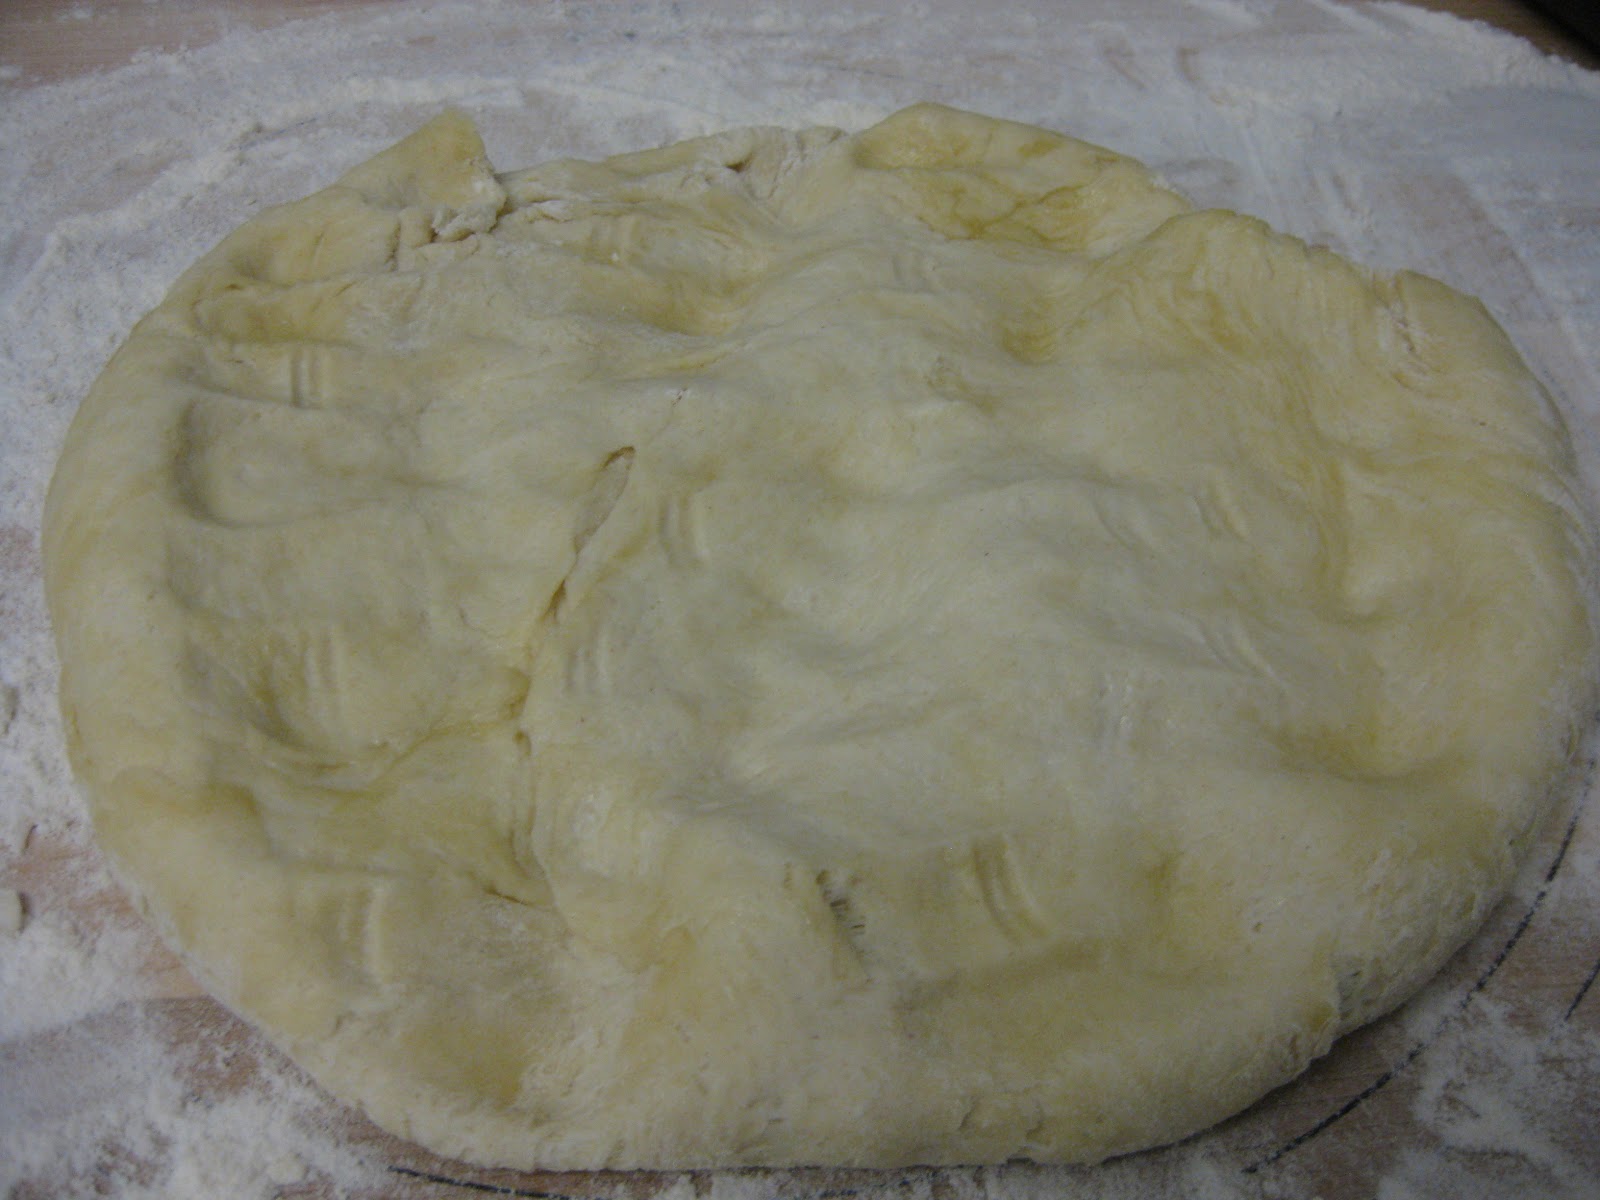

After the dough was placed into the pan, I let it rest for 15 minutes as per the recipe, but honestly I didn't see the dough rise whatsoever. So I just began sprinkling with toppings! I first coated the dough with a light layer of olive oil - no clue what effect it had - but next time I think I'm going to try to add some sort of sauce. What kind of sauce? I have no clue. I will let you know after I scout out Certe's pizza again...

My original plan was just to sprinkle some shredded hash browns, corn, chopped spring onion, and some mozzarella cheese, but then I found chopped onions and cheddar cheese in my fridge and couldn't resist. Naturally, I ended up with too thick of a layer of toppings but oh well, the dough was nearly 3 times as thick as the toppings anyways! Then I threw the pizza into the oven at 425 for about 25 minutes and...

My first (sort of) pizza!! I'll admit it didn't taste great - it was basically a slab of bread with some toppings baked on top, but it didn't taste bad either! Plus, the dough was a very nice texture - not too tough and still ever so wonderfully soft and chewy. And you know what? At least this pizza is much healthier than what you might get outside at a pizza place!


Monday, December 26, 2011
Christmas Countdown Day 12: 12 Drummers Drumming

Here it finally is, what we've all been waiting for: Christmas Countdown Day 12 (i.e. Christmas Eve)! Today was an extraordinarily busy day (I had to prepare 4 large dishes for a Christmas Eve potluck), so I wasn't able to prepare what I had ideally wished to make for Day 12 (Soy garlic glazed drumsticks), but instead I'm just going to pretend like one of the 4 dishes I prepared fit the theme of 12 drummers drumming. And the dish I choose to represent 12 drummers drumming is....baked macaroni and cheese! When you think about it, drummers curl their arms in such a way that their arms look like elbow macaroni so...slight (albeit very, very slight) connection there. But my other options were kimchi pork belly buns, miso butter corn, and Chinese sticky rice so...which would you have chosen if you were me??
By the time I started making the mac and cheese, I was extraordinarily rushed and had to eyeball everything so I don't have any measurements for this recipe. Also I would have ideally liked to incorporate a little truffle oil (I know, I know, it's not real truffle), but I didn't have any, so what can you do?
For the cheese sauce, I went with 3 kinds of cheese: gruyere, swiss, and mild cheddar. Altogether, these cheeses mix to form a light cheese sauce - perfect for those who are not that partial to strong cheeses. I melted 6 tbsp of butter in a pot, then whisked in 4 tbsp of flour (very quickly, because it thickens up quite fast). I whisked in 1 cup of hot milk and 1 cup of warm heavy cream until well incorporated. I then slowly began to add in the cheeses (about 2 cups of each), mixing with a wooden spoon until the cheese were all melted. If you want your sauce to be slightly creamier, add a little more heavy cream and milk (I ended up using about 2 cups of milk and 1.5 cups of heavy cream) until you reach a desired consistency. Then season with salt, pepper, and parsley (either dried or fresh) to taste.

Once the cheese sauce is ready, mix the cooked pasta (follow directions on the package), cheese sauce, and any additional add-ins you wish to incorporate - I chose bacon bits and sauteed mushrooms. Pour into a baking dish and top with a bread mixture of panko crumbs, diced parsley, and diced garlic (ideally puree if you can). Pop the pan into a 375 F oven for about 30 minutes or until the topping is golden brown and the mac and cheese is bubbly.


Merry Christmas and Happy Holidays!
Christmas Countdown Day 11: 11 Pipers Piping

I decided to make mini pecan pie tarts because they bring up fond childhood memories of my mom preparing these tarts for me to share with my kindergarten class and because...they're easy to eat! I went with my mom's recipe for the pie crust and followed a slightly modified Allrecipes recipe for the filling.
To prepare the crust, I mixed 3 oz of softened cream cheese with 1.5 cups flour and 1 stick of softened butter. Once the dough was prepared, I rolled the dough flat and cut out circles of dough to place into my mini muffin pan. I found that after the dough was rolled out once, it was a lot harder to re-knead (to roll out additional circles from the remaining crust), so I only managed to make about 24 mini tarts.
For the filling, I found that I often run into a issue with making my batter slightly lumpy - as if the egg has cooked. In fact, even though I've made the pecan pie filling many many times, I still cannot quite figure out if I've been improperly tempering the egg. I do vaguely recall making this filling in the past without ever running into this lumpy filling issue but...I really don't know. Perhaps I will start taking pictures of this process to reference...which I conveniently forgot to do this time around.
To avoid any possibility of cooking the egg in the melted butter, I whipped the eggs in a separate bowl from the rest of the filling and added the whipped eggs back in after everything (aside from the nuts) have been added in. But I have to admit that even after waiting for the filling to come to room temperature before mixing in the eggs, it STILL looked like I had cooked the eggs in the filling. Maybe I shouldn't have used a stand mixer for this? I still don't know...

The only other modification I made was that I added less sugar - 3/4 cup brown sugar - and slightly more nuts, depending on how runny the filling was looking. After spooning the filling into the tart shells, I popped them into a 350 F oven for 15 minutes.

Friday, December 23, 2011
Christmas Countdown Day 10: 10 Lords a Leaping
If you thought Christmas Countdown Day 8 was bad, wait until you hear about Day 10: 10 Lords a Leaping. For today's Christmas Countdown dish I decided to go with....nothing. I simply couldn't think of anything. People had suggested using frog legs (which is really a rather good idea), but I really don't like frog legs at all. Alternatively, the idea of roasting rabbit had also been posed, but I also cannot stand eating rabbit meat. I had considered making La Galette des Rois, but I really didn't feel like eating it! Finally, I was all set to make popcorn (which I figured "leaps" around when it is popped...except that it really just pops) drizzled with white chocolate and peanut butter (to make a sort of golden - and thus royal - color), but then I got really weird looks from my family and decided not to waste food on what would surely be a doomed project.


Instead, I went to Stella's Bakery in Maryland and ate a delicious "Bougatsa." The first time I had this pastry was many years ago at their grand opening (or what I thought was their grand opening because they gave these out for free) and ever since then I have always dreamed of having this pastry again. It's a rather simple pastry - puff pastry with a filling made of cream custard, cinnamon, and topped with powdered sugar - but it's just so good! It's kind of like eating a Portuguese egg tart...but not. And when warm and eaten alongside a cup of coffee, it's perfect!


And then I thought about it (a lot) and realized - this pastry kind of captures the elements of what I wanted to create in my 10 Lords a Leaping dish! Like a Galette des Rois, the pastry was made with puff pastry...and like the golden popcorn, the custard filling of this pastry was golden!
Okay, I know this is a giant stretch, but what can I say - I really had nothing else to use!
Christmas Countdown Day 9: 9 Ladies Dancing

So Day 9 is where it starts to get hard...9 ladies dancing clearly does not have an obvious food translation, so I had to throw in a splash of creativity for today's dish. I tried to brainstorm as many feminine foods as possible and came up with: seafood and ladyfingers. To incorporate the dancing aspect, I figured I'd introduce some sort of alcohol element into today's dish to "get the ladies dancing!" So on the savory side I figured I could do a seafood in wine dish or for the sweet side I could make a tiramisu. But since I'm at home for Christmas and my family tires of me making endless desserts that they are forced to consume, I chose to take the savory route.
I kind of ended up making this recipe on the fly, incorporating whatever ingredients I could find in the kitchen - this I do not recommend. For instance, I grabbed a container that I thought contained salt and did not realize until the very last minute that I had been using sugar all along. On a similar note, after I thought I had finished the dish, I would come across another ingredient that I thought would be a delightful addition and I would end up doing...something wrong (i.e. I spilled a whole bunch of sea salt into the pan when I only meant to add a pinch). Also, once I started adding ingredients into the pan, I realized I had no idea where I wanted to go with the dish and spent countless seconds staring blankly at the pan. Lastly, though I was ultimately okay with using plum wine for my sauce, I think it could have been nice to use tequila instead (and really make those ladies dance).
Anyways, for today's dish I chose to make roasted shrimp atop a bed of corn and sweet onion in a plum wine sauce. I had envisioned using smoky, fire-roasted shrimp for this dish, but alas, I just roasted the shrimp in the oven and all that really happened was that it...cooked. But if you have access to a grill, I'd highly recommend you grill the shrimp instead; the charcoal flavor could have played wonderfully against the sweet flavors of the rest of the dish.

To prepare the shrimp, I pre-heated the oven to 400 F and spread a layer of shrimp in a roasting pan. I seasoned the shrimp with salt (well actually, I used sugar but I would've preferred salt...) and pepper, a dash of lemon juice, and a drizzle of olive oil. I then placed the pan in the oven and roasted for 15 minutes (or until the shrimp turned pink and were fully cooked). Because I didn't realize I had used sugar instead of salt until the shrimp were done, I sprinkled salt over the shrimp as soon as they were out of the oven.


For the corn and onion relish, I first sauteed diced garlic in melted butter and then added in the diced onion. After the onions were browned, I threw in the corn and seasoned with salt, pepper, and parsley. I then added a splash (enough to form a thin layer in the pan) of plum wine as well as a bit of water and sauteed until the sauce slightly reduced. Because I was going for a slightly sweeter taste, I ended up adding a little bit of brown sugar...as well as an accidental sizable amount of sea salt. I couldn't quite figure out where I really wanted to take the sauce, so I chose to just remove the pan from heat and eat it as is. I'm still not too sure what I wanted the sauce to be like - it was fairly sweet with notes of plum wine, but also very salty because of the sea salt - but when I couldn't taste the overwhelming salty flavors, the sweet flavors were quite nice with the shrimp.

Christmas Countdown Day 8: 8 Maids a Milking

I really lamed out with Christmas Countdown Day 8 - sorry! I had wanted to do something nice like chocolate souffles with vanilla ice cream because maids a milking reminded me of cows and I wanted to capture the black and white theme (as well as the milk aspect), but...I ran out of time. So I went with...
Oreos in milk.
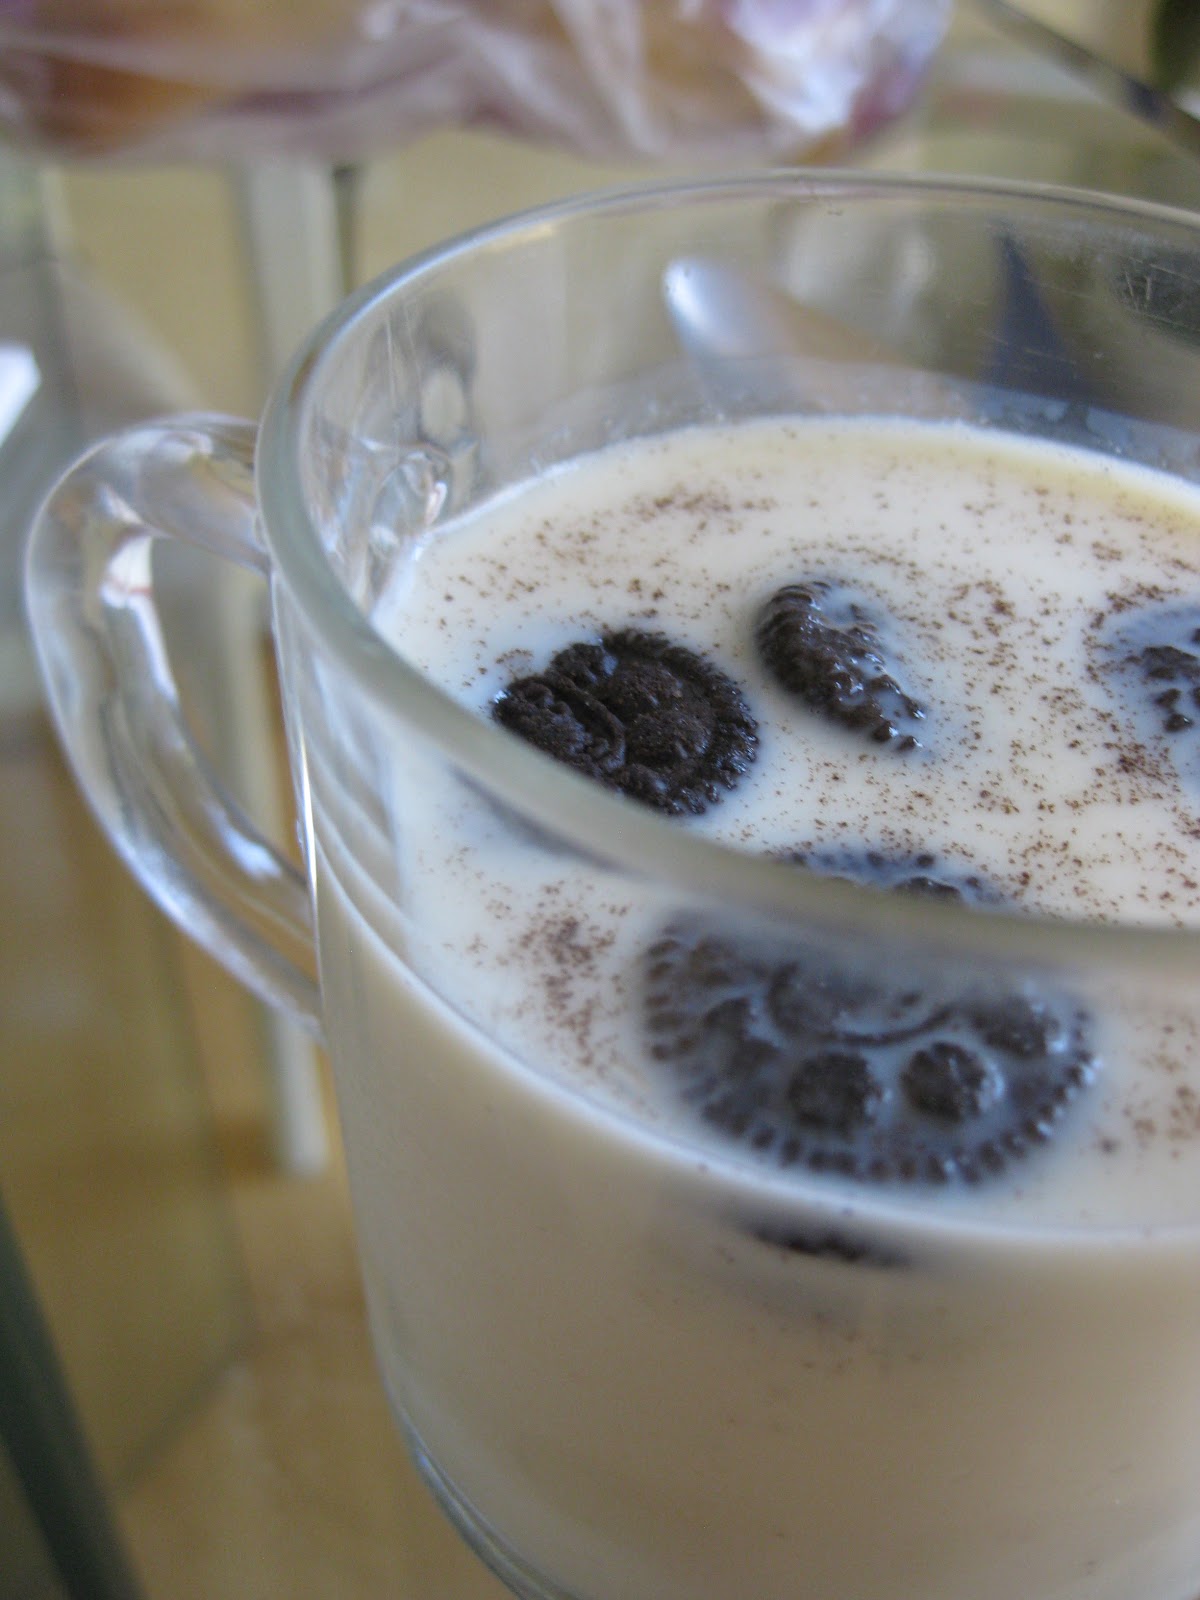
Lame, I know. I had wanted them on ice cream but by the time I got around to this, I was too tired to even eat ice cream...

I chose mini oreos for this because, well, they're way cuter than normal oreos. And also you can throw multiple cookies into a glass of milk and eat them with a spoon!
Ok, I know this day 8 post is just terrible. But I swear I had an excuse! It was the night before I was planning to head home for Christmas, so I had lots to do, including making these...


Christmas cookies (and white chocolate and peppermint coated pretzels)! I know it's no excuse, but I really wanted to make these and spread Christmas cheer around to my friends and coworkers - which (I think) I did, so...success for the spirit of my Christmas Countdown, even though these cookies had absolutely no part in my Christmas Countdown!
Subscribe to:
Posts (Atom)