Monday, December 26, 2011

Christmas Countdown Day 12: 12 Drummers Drumming


Here it finally is, what we've all been waiting for: Christmas Countdown Day 12 (i.e. Christmas Eve)! Today was an extraordinarily busy day (I had to prepare 4 large dishes for a Christmas Eve potluck), so I wasn't able to prepare what I had ideally wished to make for Day 12 (Soy garlic glazed drumsticks), but instead I'm just going to pretend like one of the 4 dishes I prepared fit the theme of 12 drummers drumming. And the dish I choose to represent 12 drummers drumming is....baked macaroni and cheese! When you think about it, drummers curl their arms in such a way that their arms look like elbow macaroni so...slight (albeit very, very slight) connection there. But my other options were kimchi pork belly buns, miso butter corn, and Chinese sticky rice so...which would you have chosen if you were me??

By the time I started making the mac and cheese, I was extraordinarily rushed and had to eyeball everything so I don't have any measurements for this recipe. Also I would have ideally liked to incorporate a little truffle oil (I know, I know, it's not real truffle), but I didn't have any, so what can you do?

For the cheese sauce, I went with 3 kinds of cheese: gruyere, swiss, and mild cheddar. Altogether, these cheeses mix to form a light cheese sauce - perfect for those who are not that partial to strong cheeses. I melted 6 tbsp of butter in a pot, then whisked in 4 tbsp of flour (very quickly, because it thickens up quite fast). I whisked in 1 cup of hot milk and 1 cup of warm heavy cream until well incorporated. I then slowly began to add in the cheeses (about 2 cups of each), mixing with a wooden spoon until the cheese were all melted. If you want your sauce to be slightly creamier, add a little more heavy cream and milk (I ended up using about 2 cups of milk and 1.5 cups of heavy cream) until you reach a desired consistency. Then season with salt, pepper, and parsley (either dried or fresh) to taste.


Once the cheese sauce is ready, mix the cooked pasta (follow directions on the package), cheese sauce, and any additional add-ins you wish to incorporate - I chose bacon bits and sauteed mushrooms. Pour into a baking dish and top with a bread mixture of panko crumbs, diced parsley, and diced garlic (ideally puree if you can). Pop the pan into a 375 F oven for about 30 minutes or until the topping is golden brown and the mac and cheese is bubbly.


Merry Christmas and Happy Holidays!

Christmas Countdown Day 11: 11 Pipers Piping


For Christmas Countdown Day 11, I had originally planned on preparing cream puffs (because you "pipe" the cream filling into the pastry), but since I was at home and my family is not too keen on eating dairy, I had to go another route. Since friends had previously mentioned on Countdown Day 7 that they had thought the chicken pot pies were for "11 pipers piping," I decided to go with pies. I had also considered making pirouette type cookies and filling them with some sort of white chocolate peppermint cream filling, but I didn't really want to think about how to bake tubular cookies.

I decided to make mini pecan pie tarts because they bring up fond childhood memories of my mom preparing these tarts for me to share with my kindergarten class and because...they're easy to eat! I went with my mom's recipe for the pie crust and followed a slightly modified Allrecipes recipe for the filling.

To prepare the crust, I mixed 3 oz of softened cream cheese with 1.5 cups flour and 1 stick of softened butter. Once the dough was prepared, I rolled the dough flat and cut out circles of dough to place into my mini muffin pan. I found that after the dough was rolled out once, it was a lot harder to re-knead (to roll out additional circles from the remaining crust), so I only managed to make about 24 mini tarts.

For the filling, I found that I often run into a issue with making my batter slightly lumpy - as if the egg has cooked. In fact, even though I've made the pecan pie filling many many times, I still cannot quite figure out if I've been improperly tempering the egg. I do vaguely recall making this filling in the past without ever running into this lumpy filling issue but...I really don't know. Perhaps I will start taking pictures of this process to reference...which I conveniently forgot to do this time around.

To avoid any possibility of cooking the egg in the melted butter, I whipped the eggs in a separate bowl from the rest of the filling and added the whipped eggs back in after everything (aside from the nuts) have been added in. But I have to admit that even after waiting for the filling to come to room temperature before mixing in the eggs, it STILL looked like I had cooked the eggs in the filling. Maybe I shouldn't have used a stand mixer for this? I still don't know...


The only other modification I made was that I added less sugar - 3/4 cup brown sugar - and slightly more nuts, depending on how runny the filling was looking. After spooning the filling into the tart shells, I popped them into a 350 F oven for 15 minutes.


Friday, December 23, 2011

Christmas Countdown Day 10: 10 Lords a Leaping

If you thought Christmas Countdown Day 8 was bad, wait until you hear about Day 10: 10 Lords a Leaping. For today's Christmas Countdown dish I decided to go with....nothing. I simply couldn't think of anything. People had suggested using frog legs (which is really a rather good idea), but I really don't like frog legs at all. Alternatively, the idea of roasting rabbit had also been posed, but I also cannot stand eating rabbit meat. I had considered making La Galette des Rois, but I really didn't feel like eating it! Finally, I was all set to make popcorn (which I figured "leaps" around when it is popped...except that it really just pops) drizzled with white chocolate and peanut butter (to make a sort of golden - and thus royal - color), but then I got really weird looks from my family and decided not to waste food on what would surely be a doomed project.

Instead, I went to Stella's Bakery in Maryland and ate a delicious "Bougatsa." The first time I had this pastry was many years ago at their grand opening (or what I thought was their grand opening because they gave these out for free) and ever since then I have always dreamed of having this pastry again. It's a rather simple pastry - puff pastry with a filling made of cream custard, cinnamon, and topped with powdered sugar - but it's just so good! It's kind of like eating a Portuguese egg tart...but not. And when warm and eaten alongside a cup of coffee, it's perfect!


And then I thought about it (a lot) and realized - this pastry kind of captures the elements of what I wanted to create in my 10 Lords a Leaping dish! Like a Galette des Rois, the pastry was made with puff pastry...and like the golden popcorn, the custard filling of this pastry was golden!

Okay, I know this is a giant stretch, but what can I say - I really had nothing else to use!

Christmas Countdown Day 9: 9 Ladies Dancing


So Day 9 is where it starts to get hard...9 ladies dancing clearly does not have an obvious food translation, so I had to throw in a splash of creativity for today's dish. I tried to brainstorm as many feminine foods as possible and came up with: seafood and ladyfingers. To incorporate the dancing aspect, I figured I'd introduce some sort of alcohol element into today's dish to "get the ladies dancing!" So on the savory side I figured I could do a seafood in wine dish or for the sweet side I could make a tiramisu. But since I'm at home for Christmas and my family tires of me making endless desserts that they are forced to consume, I chose to take the savory route.

I kind of ended up making this recipe on the fly, incorporating whatever ingredients I could find in the kitchen - this I do not recommend. For instance, I grabbed a container that I thought contained salt and did not realize until the very last minute that I had been using sugar all along. On a similar note, after I thought I had finished the dish, I would come across another ingredient that I thought would be a delightful addition and I would end up doing...something wrong (i.e. I spilled a whole bunch of sea salt into the pan when I only meant to add a pinch). Also, once I started adding ingredients into the pan, I realized I had no idea where I wanted to go with the dish and spent countless seconds staring blankly at the pan. Lastly, though I was ultimately okay with using plum wine for my sauce, I think it could have been nice to use tequila instead (and really make those ladies dance).

Anyways, for today's dish I chose to make roasted shrimp atop a bed of corn and sweet onion in a plum wine sauce. I had envisioned using smoky, fire-roasted shrimp for this dish, but alas, I just roasted the shrimp in the oven and all that really happened was that it...cooked. But if you have access to a grill, I'd highly recommend you grill the shrimp instead; the charcoal flavor could have played wonderfully against the sweet flavors of the rest of the dish.


To prepare the shrimp, I pre-heated the oven to 400 F and spread a layer of shrimp in a roasting pan. I seasoned the shrimp with salt (well actually, I used sugar but I would've preferred salt...) and pepper, a dash of lemon juice, and a drizzle of olive oil. I then placed the pan in the oven and roasted for 15 minutes (or until the shrimp turned pink and were fully cooked). Because I didn't realize I had used sugar instead of salt until the shrimp were done, I sprinkled salt over the shrimp as soon as they were out of the oven.


For the corn and onion relish, I first sauteed diced garlic in melted butter and then added in the diced onion. After the onions were browned, I threw in the corn and seasoned with salt, pepper, and parsley. I then added a splash (enough to form a thin layer in the pan) of plum wine as well as a bit of water and sauteed until the sauce slightly reduced. Because I was going for a slightly sweeter taste, I ended up adding a little bit of brown sugar...as well as an accidental sizable amount of sea salt. I couldn't quite figure out where I really wanted to take the sauce, so I chose to just remove the pan from heat and eat it as is. I'm still not too sure what I wanted the sauce to be like - it was fairly sweet with notes of plum wine, but also very salty because of the sea salt - but when I couldn't taste the overwhelming salty flavors, the sweet flavors were quite nice with the shrimp.


Christmas Countdown Day 8: 8 Maids a Milking


I really lamed out with Christmas Countdown Day 8 - sorry! I had wanted to do something nice like chocolate souffles with vanilla ice cream because maids a milking reminded me of cows and I wanted to capture the black and white theme (as well as the milk aspect), but...I ran out of time. So I went with...

Oreos in milk.


Lame, I know. I had wanted them on ice cream but by the time I got around to this, I was too tired to even eat ice cream...


I chose mini oreos for this because, well, they're way cuter than normal oreos. And also you can throw multiple cookies into a glass of milk and eat them with a spoon!

Ok, I know this day 8 post is just terrible. But I swear I had an excuse! It was the night before I was planning to head home for Christmas, so I had lots to do, including making these...


Christmas cookies (and white chocolate and peppermint coated pretzels)! I know it's no excuse, but I really wanted to make these and spread Christmas cheer around to my friends and coworkers - which (I think) I did, so...success for the spirit of my Christmas Countdown, even though these cookies had absolutely no part in my Christmas Countdown!

Christmas Countdown Day 7: 7 Swans a Swimming


I was really looking forward to Christmas Countdown Day 7 because it would finally be my last day of poultry/fowl/bird gifts! Granted, my original plan had been to make a simple vanilla creme brulee and place chocolate swans atop the creme brulee, but then I realized I could just make a chicken pot pie (chicken "swimming" in the creamy pot pie mixture!). When I invited friends over to partake in day 7 of this countdown, most people thought the dish was inspired by "11 pipers piping" and felt that I was really stretching it for swans a swimming...but in my head it works perfectly, so chicken pot pie it is!

I took a lot of shortcuts with this recipe and went for frozen prepared pie crusts and puff pastry sheets. Normally, I also use rotisserie chicken for my pot pies, but for this batch, I went for plain old chicken thighs! But if you have the chance to use rotisserie chicken, I highly recommend you go that route - it's delicious!


I began the process by sauteeing diced onions in melted butter then tossing in my cubes of chicken thighs (I am very partial to dark meat). Once the chicken was sufficiently cooked, I tossed in my cubes of potatoes, carrots, celery, and sliced mushrooms and let cook for a few minutes. I then added in stock (I used duck stock, which I had prepared a while back from my Turducken) and seasoned with salt, pepper, garlic salt, and chicken bouillon powder. I then let this all stew for about 15 minutes on medium-high heat.

While the filling was stewing, I preheated the oven to 425 F and prepped my deep dish pie crusts and puff pastry sheets. I had defrosted the puff pastry sheets in the refrigerator overnight and let the pie crust defrost on the counter for about 10 minutes. I unrolled my puff pastry sheets (which was actually a rather difficult task - if you over-defrost the puff pastry, it gets really sticky) and pricked holes on the bottom of my pie crusts. 

After letting the vegetables cook and soften for 15 minutes, I added in ~1/3 cup flour, ~3/4 cup milk...and then additional stock (as needed) to reach a desired consistency. Mix well until the filling thickens and then remove from heat and pour into the pie crusts. At the very last minute, I second guessed myself and added more stock because I was afraid the filling was too thick and would somehow dry out while baking...but that was a mistake - oh well! Just know that if your filling is too runny, a) it's still edible and b) if you refrigerate, the filling will set nicely in the fridge and will be less runny the next day. 


Once the filling was all poured in, I placed a single puff pastry sheet on top of the pie and sealed the pot pie shut! I also poked little slits in the top of the puff pastry to let steam escape from the pie while baking.


I folded up the edges of my puff pastry (instead of cutting the excess pastry off) because...well I like puff pastry! I placed the pies on a baking sheet to allow for easy removal from the oven and popped the pies into the oven for 30 minutes (or until the puff pastry is golden brown). Enjoy!


Sunday, December 18, 2011

Christmas Countdown Day 6: 6 Geese a Laying


For Christmas countdown day 6, I decided to take the challenge of...roasting a goose! I've had roasted goose before, usually for major holidays like Thanksgiving or Christmas, and I always remembered it being absolutely delicious - like an entire bird of dark meat with an amazing layer of delectable skin. And I've heard that the high fat content in geese help keep the meat more tender, so I was excited to face this roast goose challenge!

Surprisingly, you cannot easily find geese in New York City, and I simply do not know why. Whole Foods does sell a limited number of frozen geese, but they sell them at $10/lb, which I simply was not willing to pay for this challenge! After trekking around to Citarella, Trader Joe's, Dean & Deluca, and Dickson's Farmstand Meats, I was just about ready to give up, until I magically found a goose at Hong Kong Supermarket in Chinatown...for about $5 per lb. I quickly scooped one up and lugged it home.


To brine the goose, I chose to take a more Asian approach and create a brine of dried star anise, soy sauce, orange juice, salt, pepper, and water. After an overnight brine, I plopped the goose onto my roasting pan, wrapped foil around the ends of the drumsticks and wings (to prevent them from burning too quickly), filled the bottom of the roasting pan with some water, and threw the bird into a 350 F oven. I then decided to take the existing brine and reduce it and use to baste the goose. But naturally the brine required some tweaking (because it was kind of bland...) so I added a little more soy sauce, a lot of brown sugar, and a little bit of honey. I then brined the goose every 20 minutes (in retrospect, probably a bad idea - I'm guessing I shouldn't have opened the oven quite so much) until the goose reached a temperature of 170 F, which for my 10 lb goose, took around 2 hrs and 45 mins.

The goose was flavorful, but not quite as good as my dad makes it...and the meat was significantly more dry. Thankfully, goose on its own has a delicious flavor (at least much more so than turkey), but I still wish I had managed to cook a slightly more moist goose. At the very least, I think a little bit of gravy could have really helped the slices of meat that had little to no skin attached...but I just really did not feel like throwing together a gravy at that point. I still think goose is a worthwhile substitute for turkey at Thanksgiving/Christmas/etc, but I do not think I will be roasting another one again - or at least not until I learn how to not overcook my poultry...

Saturday, December 17, 2011

Christmas Countdown Day 5: 5 Golden Rings


To be honest, I was quite excited for 5 golden rings. And for good reason too - think about how much emphasis is placed on this gift in the song?? All week, I had ambitiously worked on planning 5 golden ring-inspired recipes to produce for day 5 of my Christmas countdown, but when I looked at how much food I have been cooking and eating for the past few days (as well as thought about how much I will have to cook and eat for the next few days), I decided to just stick with one recipe.

And for my one recipe, I went with something that I knew would be delicious - rum cake (in the shape of rings, of course).

This recipe was actually taken from Allrecipes: Golden Rum Cake Recipe (I know, I said I wouldn't use a recipe...), but in all fairness, this was a recipe I had used long, long ago. I made some minor tweaks, but still kept the spirit of the original recipe intact.

My first major change was that I did not make a giant Bundt cake and instead poured the batter into a donut pan to produce what I had hoped would be beautiful golden rings. But after baking, I quickly remembered that whenever I make rum cake, the cakes have a nasty habit of sinking, so I knew I would not emerge with beautiful golden rings. But cake is cake, regardless of how it looks, so I went forward with it!

Just to note a few of the tweaks I made to the recipe (in case you're curious and want to try my version out):
  • Left out the walnuts (because I don't like them)
  • Used 1/2 cup of milk instead of 1/2 cup of water
  • Replaced 1/2 cup of vegetable oil with 1/2 cup of melted (and cooled) butter
  • Used Malibu Coconut Rum instead of dark rum (to get that delicious coconut-y flavor!)
Also, when I poured the rum into the glaze (after removing it from heat and pouring into a separate bowl), I noticed the glaze instantly began to congeal and form these unsightly clumps. So I simply poured the whole mixture back into a pan and reheated on the stove until it was one uniform mixture again. And I even reaped the benefit of slightly burning off some of the alcohol flavor (great for those who are not partial to alcohol!).


Clearly the rings were not beautiful, especially since they did not separate from the pan (oops), but I figured I had to at least show them so that I could check "5 golden rings" off of my list. On a more positive note, the cupcakes turned out better...


Christmas Countdown Day 4: Four Colly/Calling Birds


I still cannot figure out if the gift was meant to be 4 calling or 4 colly birds, but either way, I know that these birds are not meant to be eaten, so I took a more loose interpretation. For my Christmas countdown day 4, I prepared...Roasted Cornish Hens with Wild Rice Stuffing!

For the record, I have never eaten or prepared cornish hens (or wild rice stuffing), so this was a new experience for me (much like many of the dishes prepared in my Christmas countdown). I chose to take a rather simple approach to these birds and roast them in a very simple manner, though with a new twist - I've never roasted a stuffed bird before!


I first prepared the wild rice stuffing, cooking the rice on the stove according to the directions on the bag. Once ready, I added in 2 tbsp of butter, diced onion and mushroom and sauteed with a dash of salt and sage. To top it off, I added about 1/4 cup chicken stock, let mix for a moment, and then removed from heat. (Note:  amounts may have varied, as I actually did not really measure anything.)


To prepare the cornish hens, I washed the birds both inside the cavity and outside then placed them in a shallow roasting pan. I slathered a mixture of salt, pepper, and garlic salt along the skin of the hens, along with butter (about 1.5 tbsp per bird). To finish, I spooned the wild rice stuffing into the cavity and popped the birds into a pre-heated 350 F oven.


For some reason, I decided I would let the birds roast for an hour before checking on them. Once an hour had elapsed, I inserted the thermometer slightly into the birds and noticed it was still at 150 F, so I threw them back into the oven for another 30 minutes. But when I next removed the birds from the oven (and actually shoved the thermometer into the cavity of the hen), the thermometer skyrocketed past 200 F! Clearly the birds were well cooked, but I just cannot pinpoint at which moment in time the birds were done - perhaps it was 1 hr 15 mins in, or maybe it was even before the 1 hr mark (since I had improperly measured the temperature) - who knows. All I knew was that it was time to eat!


Though the breast meat was not as moist as it could have been, for a bird that was significantly overcooked, the meat was still quite tender! The skin was crisp and flavorful and the meat was surprisingly still juicy. The wild rice stuffing was incredibly fragrant and the flavors of the butter (ESPECIALLY the butter), onion, mushroom, and wild rice fused together delectably.

If you've never tried before, I would highly recommend you try at least once to roast cornish hens - it's easy, delicious, and these mini birds are quite cute!

Thursday, December 15, 2011

Christmas Countdown Day 3: Three French Hens


So today something suddenly snapped and I found myself in the Christmas spirit - yay! Unfortunately, all this really means is I start spending money on Christmas-y things that are surely not very practical and I listen to hours and hours of Christmas music, but whatever - as long as I'm happy! :)

Feeling once again motivated to continue this countdown, for today's challenge of 3 french hens, I chose to conquer...coq au vin! Now the silly thing about this challenge is that not only do I not know how to make coq au vin, I've never even had it before! But no worries - I took the name and just went with it.

...and also I perused a few recipes online, but they seemed to take way too long so I just went my own route.


I didn't have any bacon, pork belly, or pork lard on hand, so I chose to just melt 3 tbsp of butter in a pan and throw in some onions and shallots. Once caramelized, I added in my chicken thighs and let them cook for about 10 minutes. During those 10 minutes, I prepared my tomatoes, celery, and mushrooms.


After adding in the vegetables, I added a dash of salt, pepper, rosemary, and thyme and let the combo stew on medium heat for about 20 minutes. I then poured in 2 cups of pinot noir (and drank the rest of the bottle!), tasted, and realized it was missing a little something. So I added in 5 cloves of diced garlic, 2 tbsp of brown sugar, and another 1/2 tsp of garlic powder...just in case...and let stew for 30 minutes.


After letting the sauce reduce (if not already reduced, heat on high for about 10 minutes), I threw everything into the oven at 350 F for about 45 minutes. If you have any onion or mushrooms left, toss them into the pan!


After finished baking, remove from the oven and serve. Bon appetit!


Wednesday, December 14, 2011

Christmas Countdown Day 2: Two Turtle Doves


After yesterday's disappointment, I was rather excited to face today's challenge: 2 Turtle Doves! Why you may ask? Because for today's experiment, I chose to interpret turtle doves not as a savory dish of poultry, but instead as candy turtles coated with Dove chocolates! Much to my surprise, I also woke up slightly more excited for the holidays - I guess this countdown really is working?

...but then as I hopped into the subway with Christmas music playing through my headphones, I felt a slight tinge of shame, as if I were listening to Christmas music in July. Not wanting to completely extinguish my slight burst of holiday spirit, I headed towards Dunkin Donuts in search of a Christmas-themed coffee or donut and found...nothing! To be fair, there was one donut glazed with green frosting but...really, nothing else? Not even one peppermint drink or one chocolate peppermint donut? Sigh, New York City - where is your Christmas spirit??

On another completely random side note, I headed to the Food Emporium in Union Square after work to pick up the ingredients for today's project and discovered that this particular store is absolutely awesome - it's almost as well-stocked as a suburban grocery store; I even found Twinkies!

So back to the turtle doves. Ok, I hate to say it, but I failed again. I was so excited for what was sure to be a guaranteed success too - mixing pecans with caramel and coating them in chocolate: how hard can it be?? The most difficult part of this recipe was the caramel, but considering that I've made caramels many times in the past (especially around holiday season), I thought I had nothing to worry about. Boy was I wrong! But on a slightly more positive note, the end result wasn't quite as bad as it could have been; I merely ended up with chocolate covered pecan TOFFEE bites instead of caramel. In fact, I suppose this result could be considered a success given that I prefer toffee over caramel and have always wanted to make toffee but never quite got around to it!


To kick off the process, I tossed about 2 cups of pecans onto a baking sheet and toasted them in the oven at 375 F for 10 minutes because...well toasted pecans just sounded like a nice addition. Toasting the pecans definitely gave them a richer, toasty flavor as well as a more crisp texture, but honestly I could have gone either way, especially since I've never really liked pecans (except in pecan pie!).


Making the caramel seemed (keyword: SEEMED) fairly straightforward: I melted 5 tbsp butter, approx 1 tsp sea salt, and 1 cup heavy cream in a saucepan until it boiled (ok, I got distracted and let it boil for a few minutes) and set aside. In a separate pot, I combined 1.5 cup white sugar, 1/4 cup dark corn syrup (would have preferred light corn syrup, but lo and behold, I ran out), and 1/4 cup water, stirring over heat until the sugar melted and then letting it continue to boil (without stirring) until it turned a nice caramelized brown color.


I then poured the butter/cream mixture (which actually had formed a rather gross skin on top, so I ran the mix through a sieve) into the caramel, clipped a candy thermometer to the side of the pot, and began stirring away at the crazy bubbles! However, I did make one slight deviation - I removed the caramel from heat so that I could take the pecans out of the oven...and take pictures. I'm not sure how big of an effect removing from heat had, but it did take a little longer before the mixture started bubbling.


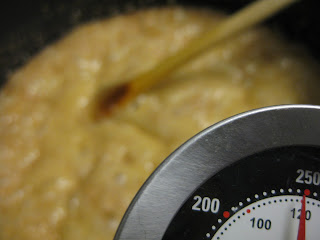
After much stirring, the mixture began to slowly rise in temperature and once it broke the 240 F barrier, the temperature shot up - so watch your thermometer carefully! Also make sure to always keep the stove's heat constant (at high, if you're able to really pay attention and stir frequently) and not switch back and forth between medium and high heat, even if you are getting impatient; switching back and forth has dire effects on your caramel's temperature. Lastly, make sure your candy thermometer is properly set up so that it's actually in the liquid...in fact, better that it be touching the bottom of the pan than floating in the air because if your caramel gets too hot, it will turn to toffee! And since the caramel inside candy turtles is supposed to be chewy, I really don't think it can hurt to remove the caramel from heat before it even reaches 248 F...though I don't actually know because I've never tried.


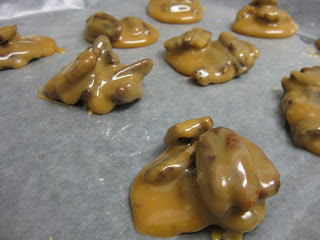
I then mixed the nuts into the caramel mixture and started to spoon clusters of nuts and caramel onto wax paper, letting the clusters harden at room temperature for an hour (or two hours if you've succeeded in producing a chewy caramel). However, a few notes: 1) work FAST, the caramel hardens quickly even if you have successfully made caramel and not toffee 2) use parchment paper and oil it because your caramel will definitely stick to wax paper and very possibly plain parchment paper as well.


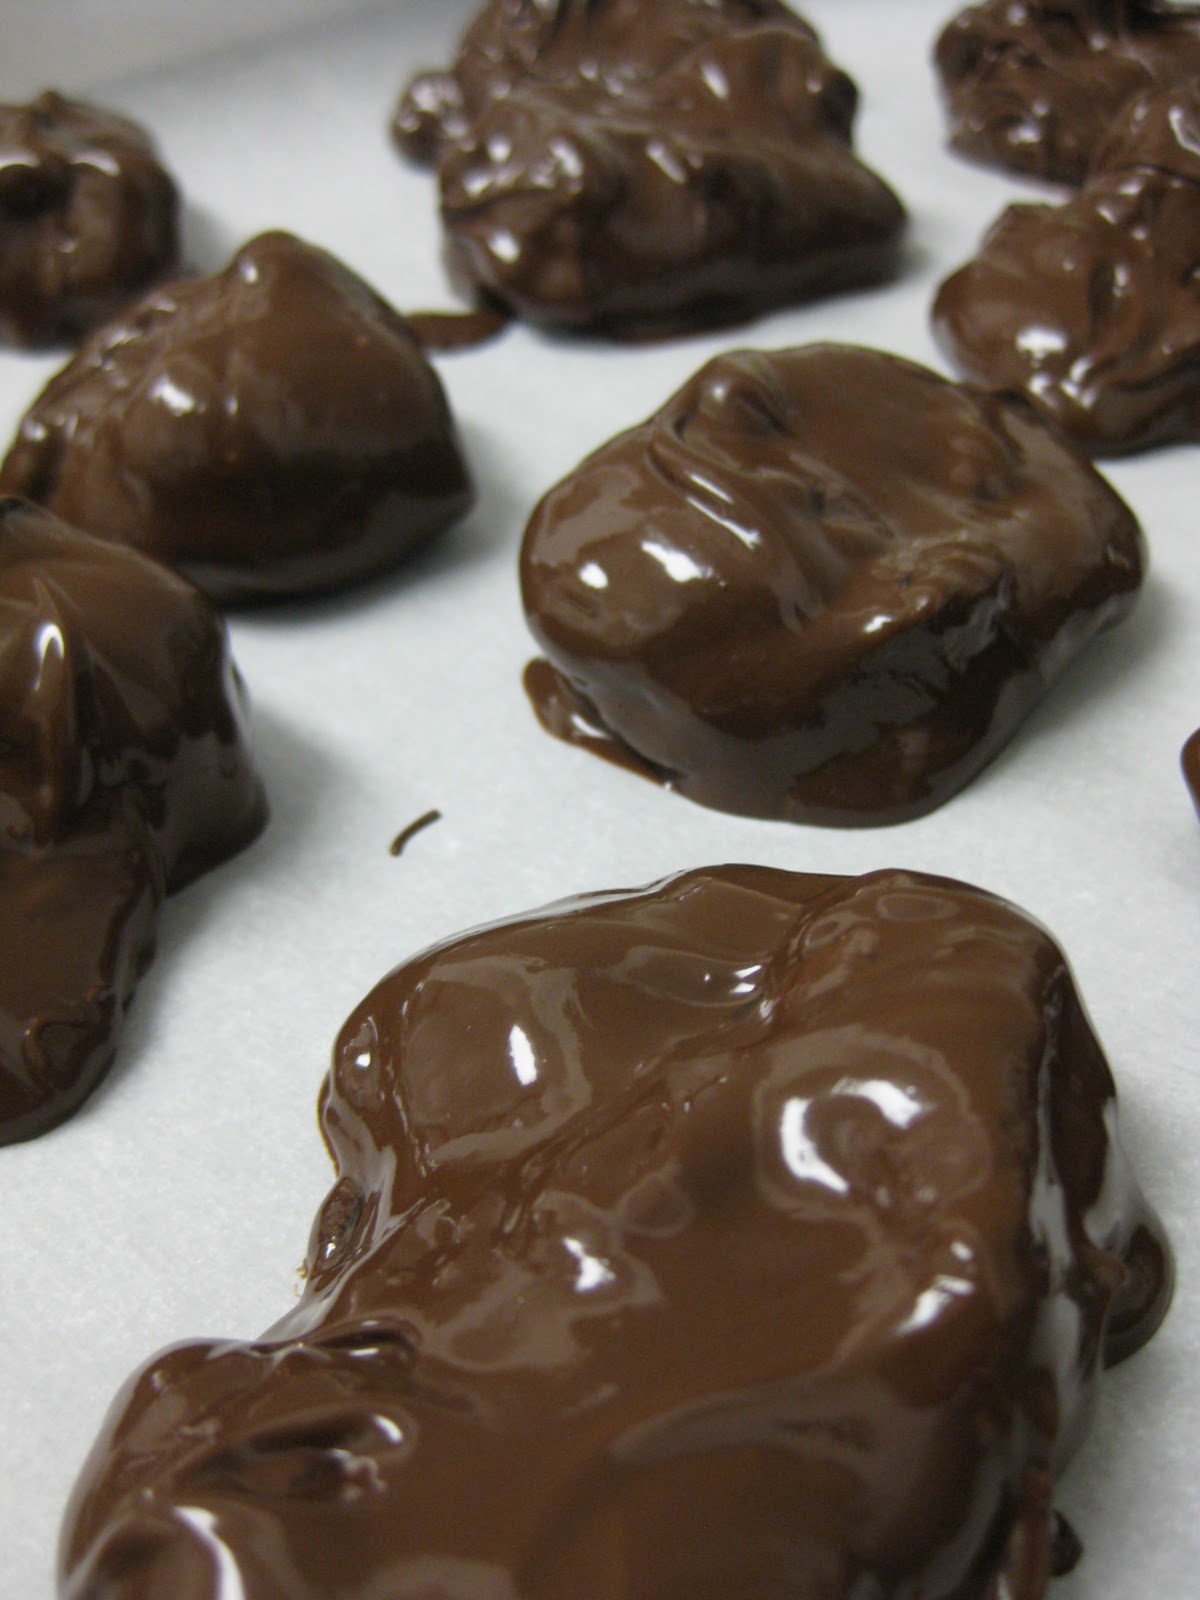
I chose to mix together both milk and dark chocolate because I was hoping to capture that delicate balance between chocolate being too sweet and too...not sweet, but after tasting the finished good, I realized it really does not matter - just pick one. I unwrapped the chocolates (about half of each bag), poured them into a bowl, and began heating in the microwave on half power for one minute intervals, stirring in between until the chocolate was fully melted. Once melted, I took each cluster and dipped them in the chocolate, making sure to coat evenly around the cluster, and placed onto a sheet of parchment paper to cool.


Honestly, these "turtle doves" taste fine - they taste like toffee with pecan bits coated in chocolate. And now I am inspired to actually make toffee to hand out as holiday treats. Yay for inspiration!


And because these are Dove chocolates, I absolutely had to read the message on each of the wrappers I had opened. The very first wrapper I picked up told me to "slow down" - this could have been great advice while making today's caramel!

Excited and worried for tomorrow's experiment: 3 French Hens. As a disclaimer, I have never cooked nor have I even tasted what I wish to make tomorrow, so it will actually be a lot more difficult for me to proclaim day 3's project a failure (I hope)!