Saturday, December 17, 2011

Christmas Countdown Day 4: Four Colly/Calling Birds


I still cannot figure out if the gift was meant to be 4 calling or 4 colly birds, but either way, I know that these birds are not meant to be eaten, so I took a more loose interpretation. For my Christmas countdown day 4, I prepared...Roasted Cornish Hens with Wild Rice Stuffing!

For the record, I have never eaten or prepared cornish hens (or wild rice stuffing), so this was a new experience for me (much like many of the dishes prepared in my Christmas countdown). I chose to take a rather simple approach to these birds and roast them in a very simple manner, though with a new twist - I've never roasted a stuffed bird before!


I first prepared the wild rice stuffing, cooking the rice on the stove according to the directions on the bag. Once ready, I added in 2 tbsp of butter, diced onion and mushroom and sauteed with a dash of salt and sage. To top it off, I added about 1/4 cup chicken stock, let mix for a moment, and then removed from heat. (Note:  amounts may have varied, as I actually did not really measure anything.)


To prepare the cornish hens, I washed the birds both inside the cavity and outside then placed them in a shallow roasting pan. I slathered a mixture of salt, pepper, and garlic salt along the skin of the hens, along with butter (about 1.5 tbsp per bird). To finish, I spooned the wild rice stuffing into the cavity and popped the birds into a pre-heated 350 F oven.


For some reason, I decided I would let the birds roast for an hour before checking on them. Once an hour had elapsed, I inserted the thermometer slightly into the birds and noticed it was still at 150 F, so I threw them back into the oven for another 30 minutes. But when I next removed the birds from the oven (and actually shoved the thermometer into the cavity of the hen), the thermometer skyrocketed past 200 F! Clearly the birds were well cooked, but I just cannot pinpoint at which moment in time the birds were done - perhaps it was 1 hr 15 mins in, or maybe it was even before the 1 hr mark (since I had improperly measured the temperature) - who knows. All I knew was that it was time to eat!


Though the breast meat was not as moist as it could have been, for a bird that was significantly overcooked, the meat was still quite tender! The skin was crisp and flavorful and the meat was surprisingly still juicy. The wild rice stuffing was incredibly fragrant and the flavors of the butter (ESPECIALLY the butter), onion, mushroom, and wild rice fused together delectably.

If you've never tried before, I would highly recommend you try at least once to roast cornish hens - it's easy, delicious, and these mini birds are quite cute!

Thursday, December 15, 2011

Christmas Countdown Day 3: Three French Hens


So today something suddenly snapped and I found myself in the Christmas spirit - yay! Unfortunately, all this really means is I start spending money on Christmas-y things that are surely not very practical and I listen to hours and hours of Christmas music, but whatever - as long as I'm happy! :)

Feeling once again motivated to continue this countdown, for today's challenge of 3 french hens, I chose to conquer...coq au vin! Now the silly thing about this challenge is that not only do I not know how to make coq au vin, I've never even had it before! But no worries - I took the name and just went with it.

...and also I perused a few recipes online, but they seemed to take way too long so I just went my own route.


I didn't have any bacon, pork belly, or pork lard on hand, so I chose to just melt 3 tbsp of butter in a pan and throw in some onions and shallots. Once caramelized, I added in my chicken thighs and let them cook for about 10 minutes. During those 10 minutes, I prepared my tomatoes, celery, and mushrooms.


After adding in the vegetables, I added a dash of salt, pepper, rosemary, and thyme and let the combo stew on medium heat for about 20 minutes. I then poured in 2 cups of pinot noir (and drank the rest of the bottle!), tasted, and realized it was missing a little something. So I added in 5 cloves of diced garlic, 2 tbsp of brown sugar, and another 1/2 tsp of garlic powder...just in case...and let stew for 30 minutes.


After letting the sauce reduce (if not already reduced, heat on high for about 10 minutes), I threw everything into the oven at 350 F for about 45 minutes. If you have any onion or mushrooms left, toss them into the pan!


After finished baking, remove from the oven and serve. Bon appetit!


Wednesday, December 14, 2011

Christmas Countdown Day 2: Two Turtle Doves


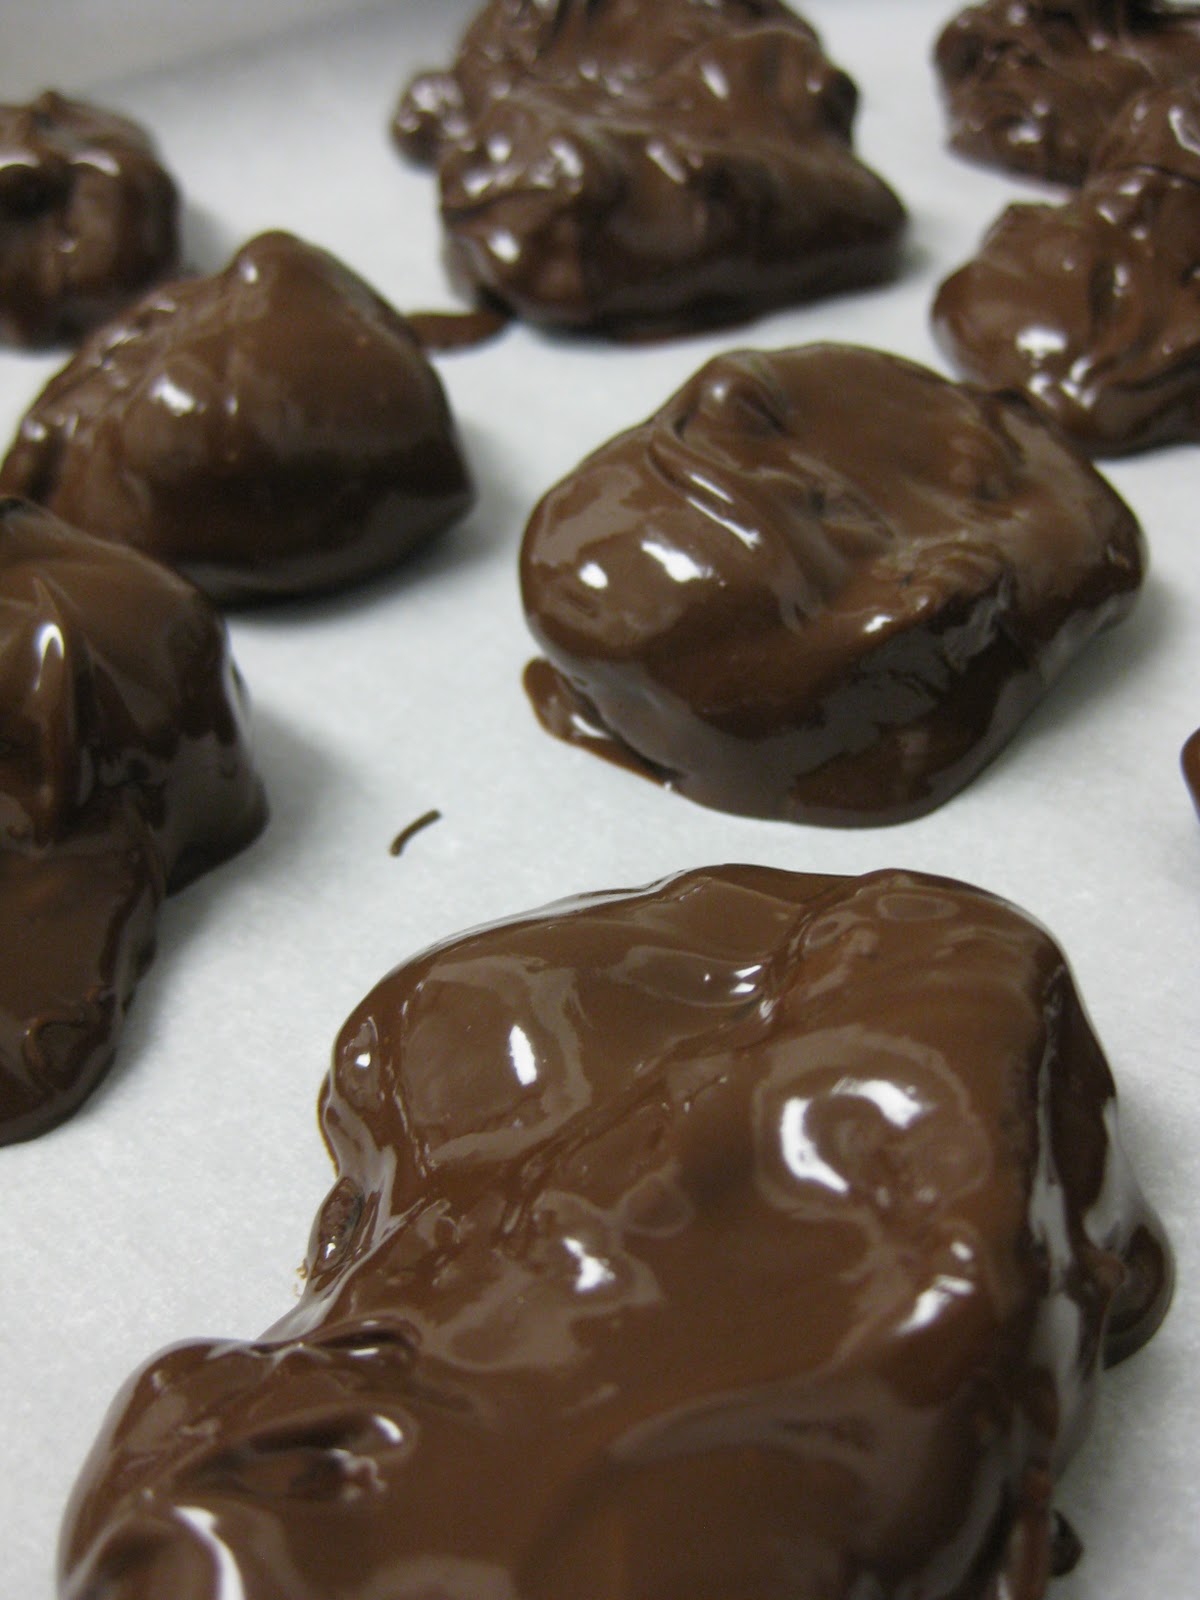
After yesterday's disappointment, I was rather excited to face today's challenge: 2 Turtle Doves! Why you may ask? Because for today's experiment, I chose to interpret turtle doves not as a savory dish of poultry, but instead as candy turtles coated with Dove chocolates! Much to my surprise, I also woke up slightly more excited for the holidays - I guess this countdown really is working?

...but then as I hopped into the subway with Christmas music playing through my headphones, I felt a slight tinge of shame, as if I were listening to Christmas music in July. Not wanting to completely extinguish my slight burst of holiday spirit, I headed towards Dunkin Donuts in search of a Christmas-themed coffee or donut and found...nothing! To be fair, there was one donut glazed with green frosting but...really, nothing else? Not even one peppermint drink or one chocolate peppermint donut? Sigh, New York City - where is your Christmas spirit??

On another completely random side note, I headed to the Food Emporium in Union Square after work to pick up the ingredients for today's project and discovered that this particular store is absolutely awesome - it's almost as well-stocked as a suburban grocery store; I even found Twinkies!

So back to the turtle doves. Ok, I hate to say it, but I failed again. I was so excited for what was sure to be a guaranteed success too - mixing pecans with caramel and coating them in chocolate: how hard can it be?? The most difficult part of this recipe was the caramel, but considering that I've made caramels many times in the past (especially around holiday season), I thought I had nothing to worry about. Boy was I wrong! But on a slightly more positive note, the end result wasn't quite as bad as it could have been; I merely ended up with chocolate covered pecan TOFFEE bites instead of caramel. In fact, I suppose this result could be considered a success given that I prefer toffee over caramel and have always wanted to make toffee but never quite got around to it!


To kick off the process, I tossed about 2 cups of pecans onto a baking sheet and toasted them in the oven at 375 F for 10 minutes because...well toasted pecans just sounded like a nice addition. Toasting the pecans definitely gave them a richer, toasty flavor as well as a more crisp texture, but honestly I could have gone either way, especially since I've never really liked pecans (except in pecan pie!).


Making the caramel seemed (keyword: SEEMED) fairly straightforward: I melted 5 tbsp butter, approx 1 tsp sea salt, and 1 cup heavy cream in a saucepan until it boiled (ok, I got distracted and let it boil for a few minutes) and set aside. In a separate pot, I combined 1.5 cup white sugar, 1/4 cup dark corn syrup (would have preferred light corn syrup, but lo and behold, I ran out), and 1/4 cup water, stirring over heat until the sugar melted and then letting it continue to boil (without stirring) until it turned a nice caramelized brown color.


I then poured the butter/cream mixture (which actually had formed a rather gross skin on top, so I ran the mix through a sieve) into the caramel, clipped a candy thermometer to the side of the pot, and began stirring away at the crazy bubbles! However, I did make one slight deviation - I removed the caramel from heat so that I could take the pecans out of the oven...and take pictures. I'm not sure how big of an effect removing from heat had, but it did take a little longer before the mixture started bubbling.


After much stirring, the mixture began to slowly rise in temperature and once it broke the 240 F barrier, the temperature shot up - so watch your thermometer carefully! Also make sure to always keep the stove's heat constant (at high, if you're able to really pay attention and stir frequently) and not switch back and forth between medium and high heat, even if you are getting impatient; switching back and forth has dire effects on your caramel's temperature. Lastly, make sure your candy thermometer is properly set up so that it's actually in the liquid...in fact, better that it be touching the bottom of the pan than floating in the air because if your caramel gets too hot, it will turn to toffee! And since the caramel inside candy turtles is supposed to be chewy, I really don't think it can hurt to remove the caramel from heat before it even reaches 248 F...though I don't actually know because I've never tried.


I then mixed the nuts into the caramel mixture and started to spoon clusters of nuts and caramel onto wax paper, letting the clusters harden at room temperature for an hour (or two hours if you've succeeded in producing a chewy caramel). However, a few notes: 1) work FAST, the caramel hardens quickly even if you have successfully made caramel and not toffee 2) use parchment paper and oil it because your caramel will definitely stick to wax paper and very possibly plain parchment paper as well.


I chose to mix together both milk and dark chocolate because I was hoping to capture that delicate balance between chocolate being too sweet and too...not sweet, but after tasting the finished good, I realized it really does not matter - just pick one. I unwrapped the chocolates (about half of each bag), poured them into a bowl, and began heating in the microwave on half power for one minute intervals, stirring in between until the chocolate was fully melted. Once melted, I took each cluster and dipped them in the chocolate, making sure to coat evenly around the cluster, and placed onto a sheet of parchment paper to cool.


Honestly, these "turtle doves" taste fine - they taste like toffee with pecan bits coated in chocolate. And now I am inspired to actually make toffee to hand out as holiday treats. Yay for inspiration!


And because these are Dove chocolates, I absolutely had to read the message on each of the wrappers I had opened. The very first wrapper I picked up told me to "slow down" - this could have been great advice while making today's caramel!

Excited and worried for tomorrow's experiment: 3 French Hens. As a disclaimer, I have never cooked nor have I even tasted what I wish to make tomorrow, so it will actually be a lot more difficult for me to proclaim day 3's project a failure (I hope)!

Tuesday, December 13, 2011

Christmas Countdown Day 1: A Partridge in a Pear Tree

The 12-day countdown to Christmas has finally begun and on day 1, we were gifted with none other than a partridge in a pear tree. I obviously had no intention of eating a partridge nor was I really keen on eating a pear tree, so as an interpretation of today's gift, I went with....roast duck glazed with pear sauce!


To give some background, for this 12 day countdown, I had originally intended to experiment and produce my own recipes each day in the hopes of magically stumbling upon some magnificent new cooking methods. However, after day 1's experiment, I think it is fairly safe to say I will not be making any groundbreaking cooking discoveries. But holding true to the idea that is easier to learn by trying and failing, I believe that over the course of these 12 days, I will emerge as a better cook, with a stronger grasp on cooking techniques and a more refined understanding of flavors. Or I'll just come out of this with food poisoning - you never know!

Today's experiment did not turn out quite so well...but in my defense, I suspected this might happen. I chose to risk it and try a few new methods, but sadly this did not work out very well for me. I was also forced to produce this dish in significantly less time than I would have liked to have, but oh well - now I know better! I only wish that I had experimented on something slightly cheaper...this was a rather expensive failure.

My plan for today's dish was to oven-roast the duck thighs, basting the skin every so often with a pear glaze concocted from pureed pears, garlic, soy sauce, and pear hard cider. The duck would be served alongside a sauteed medley of asparagus, portabello mushrooms and...sliced pears! But then it occurred to me that it might be delicious (and easier) to just roast the vegetables in the pan with the duck...and that is where I mainly went wrong.

Remember when I prepared my turducken and de-boned the duck wrong? Well thanks to that mistake, I had duck legs and wings (as well as extra strips of skin) to use for today's dish! Due to my lack of foresight, I did not brine the duck before I began cooking and ended up just poking small holes in the skin and rubbing with salt and pepper, letting it sit for a few minutes while I prepared the pear sauce. But the duck was actually not lacking in flavor, so perhaps it can really go either way.


I admittedly do not understand pears because I don't really like to eat them. The only pears I do like are Asian pears, but sadly I only had one Asian pear to work with. So as an alternative, I chose to use comice pears for today's dish because...well it was the cheapest pear sold at Whole Foods. The sign indicated that these pears would be sweet and juicy, so I figured...why not? The sign also explicitly pointed out that these pears are not good for baking because they are too juicy, but I figured a little juice couldn't hurt, so I went for them. The texture was much softer than I had hoped for (I had wanted to add slices of sweet and crunchy pears into the sauteed medley of asparagus and mushrooms), but the sweetness was definitely spot-on for the glaze.

After pureeing the pear, mixing in diced garlic, and adding in 1/2 cup of soy sauce and 1 cup of the pear hard cider, I poured this pear concoction over the duck legs to let them marinade for about 15 minutes as I prepared the vegetables. In retrospect, I don't think this brief marinade did anything, but I had hoped the carbonated pear cider would perhaps make the duck more tender. I'll just have to try again next time (and for a much longer amount of time)!


Once the vegetables and pears (I used 1 comice pear and 1 Asian pear) were sliced and ready, I spread them in an even layer on the bottom of the pan. I then placed the duck legs on top of the vegetables, skin side up and roasted them in a 400 F oven for 20 minutes. As the duck roasted, I poured the remaining pear marinade/brine into a saucepan and reduced over medium-high heat. Because the sauce did not taste strong enough for my liking, I tweaked the flavor with additional soy sauce, pear cider, and brown sugar.


After the initial 20 minutes, I reduced the heat to 375 F and basted the skin every 10 minutes with the reduced pear sauce for 40 minutes. As the duck cooked, I noticed the juices in the pan rising higher and higher and debated pouring out the excess to let the vegetables and meat roast in a dry pan. However, I also thought that the juices might potentially add an extra level of moisture to the duck and perhaps additional flavor to the vegetables, so I left all the excess juice in the pan. After one hour of baking, because I wanted the skin to be slightly more brown, I roasted at 450 F for an additional 7 minutes.

When I removed the pan from the oven, the first thing I noticed was that the comice pear slices had pretty much vanished! The duck skin also did not look as crispy as I would have liked. But it smelled good and I was starving, so I dove right in...


...and while eating, I realized I was far from satisfied. Though the flavor of the skin was quite nice - with the pleasant sweetness of the pear emerging from the salty flavors - I really would have preferred a much more crisp skin. Also the few pieces of excess duck skin that I had thrown into the pan simply had way too much fat; perhaps next time I will cut off the excess fat. But more importantly, I really just did not like the way it cooked. Because of the significant juices that piled up in the pan, the duck was cooked in more of a braised than roasted manner AND it was overcooked. Also, the vegetables in the pan had stewed for too long in the duck fat/pear juice mixture and were just...sub-par.

Next time, I will be sure to place the duck on a roasting rack. If I don't, I will be sure to at least not add pears to the pan. Perhaps the duck could have also benefited from a quick 1 to 2 minute sear in a hot pan before being tossed into the oven. And once in the oven, I will definitely roast the duck at a lower temperature - probably 350 F instead of 375 F - and cook for a shorter length of time.

After eating today's dish, I really cannot imagine myself eating roast poultry for quite some time. But there appear to be quite a number of days coming up that involve birds...so time to get creative!

Thursday, December 8, 2011

Countdown to Christmas - The Plan!


So I know I had previously stated that I would do a countdown beginning this Saturday, but then I had an awesome idea...

12 day countdown to Christmas, with each day's recipes corresponding to one of the gifts given over the course of the 12 Days of Christmas song!

I haven't yet decided if I will be creating a full meal based around the gifts or just one recipe, but I am stuck on a few of the gifts...
  • 4 Colly (Calling?) birds
  • 7 Swans a swimming
  • 9 Ladies dancing
  • 10 Lords a leaping
  • 12 Drummers drumming
Then I remembered that the 12 days of Christmas had been featured as a challenge on Top Chef, so I did a quick google search...and realized that their recipes had absolutely no relation to these gifts! 

Sigh - this is going to be quite a challenge! But as long as it helps get you in the holiday spirit (or just gets you a good laugh when I fail at some of these dishes...which is inevitable), I am up for the challenge - see you in a few days!

And in the meantime, if anyone has any ideas for recipes for the gifts above, please send them my way - I need all the help I can get!

Wednesday, December 7, 2011

Christmas is coming?


Are you feeling the Christmas spirit? Because I sure am not! Perhaps it's the unseasonably warm weather, the lack of a Christmas tree in my apartment, or the minimal Christmas treats I've seen around the office, but it just doesn't feel like Christmas is coming. And because Christmas just isn't Christmas without the pre-holiday cheer, I have decided to do something about it:

Beginning December 10, I will do a countdown to Christmas, with a different holiday-inspired recipe (or more likely, experiment) each day!

Why December 10? Because I don't have any ideas ready yet, so if you have any great ideas for a holiday-themed treat, please send them my way!

Sunday, December 4, 2011

Turducken Made Simple: Turcken Loaves

Hungry for some turducken, but don't have the time and/or patience to make one? A simple solution: turducken (or in my case, turcken) loaves to the rescue!


You might be wondering why I left out the duck in my loaves, especially since in a real turducken, the duck meat brings such a delicious flavor to the table. Short answer: Whole Foods didn't have duck breasts and I was not willing to carve my own. So turcken loaves would have to suffice! I chose to use turkey and chicken thighs for this experiment because, well, I love dark meat. You can easily substitute turkey and chicken breasts, if you wish.

Like the real turducken, the first step in this process was to de-bone the turkey and chicken thighs! You can easily purchase boneless (and skinless!) chicken thighs at the grocery store, but I happened to pick up the wrong package. But no worries - removing the bone was quite simple for these thighs. And if your chicken thighs have skin, make sure to remove the chicken skin, but absolutely leave the skin on the turkey thighs! 

Instead of pounding the meat to a thin layer (which you should do if you are producing a large turcken or turducken loaf), I chose to just slice the thighs horizontally, so as to create two flaps allowing the thighs to be opened up like a book.

Because I was trying to keep this dish as simple as possible, I chose to use Stovetop Cornbread Stuffing - just add butter, water, and mix! If you have the time or patience (or just leftover stuffing), I would recommend using a homemade stuffing to introduce a greater depth of flavors into your turcken loaves. But if not - no worries - Stovetop tastes just fine!

Laying flat the turkey thigh, sprinkle a dash of thyme, rosemary, salt, and pepper on top of the meat and spread a layer of stuffing to cover the entire surface. Place the flat chicken thigh on top, sprinkle with a dash of thyme, rosemary, salt, and pepper, and add a layer of stuffing on top of the chicken thigh. Roll up the chicken thigh so that the ends of the flaps meet, and repeat with the turkey thigh, wrapping the turkey thigh around the chicken thigh. Fasten the turkey thigh flaps together with a skewer.

Mix 2 tablespoons of butter with thyme, rosemary, salt, and pepper (I probably used about 1/2 tsp of thyme, 1/2 tsp of rosemary, 1/4 tsp of pepper, and a dash of salt). Spread one tablespoon of seasoned butter on the outside of the turkey skin, and spread one tablespoon of the seasoned butter underneath the skin so that it directly touches the meat. If you are watching calorie content, you can probably cut back on the butter, but I like my roasted meats to be as rich (and deliciously buttery) as possible.

Place the turcken loaves in a baking dish and bake at 350 F for 30 minutes, or until the loaves reach 165 F. 


Remove from heat and serve alongside your favorite vegetable(s) and/or side dish(es). I chose to serve alongside garlic-roasted broccoli, topped with a dash of lemon juice and pecorino cheese. Enjoy!